<< Previous page TOC Next page >>
7.3. INSTALLING THE MEMORY
The vast majority of computers today have memory sockets that accept the following industry-standard memory modules:
Desktops, Workstations and Servers
Notebooks and Mobile Computers
- 72-pin SIMM
- 168-pin DIMM
- 184-pin RIMM
Although sockets may be in different places on different computers, installation is the same. Consult the computer owner's manual to find out whether the memory sits on an expansion card or on the motherboard, and whether internal computer components must be moved to gain access.
- 144-pin SO DIMM
In the section below are installation instructions for the standard modules listed above, followed by installation instructions for some of the more popular proprietary memory modules. If the computer requires proprietary memory, or the instructions below don't seem to apply to your situation, phone Kingston Technology's Technical Support Group at (800) 435-0640.INSTALLING A 72-PIN SIMM
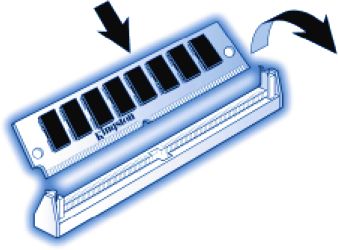
Installation of a 72-pin SIMM.
- Place your computer's power switch in the off position and disconnect the AC power cord.
- Follow the instructions in your owner's manual that describe how to locate your computer's memory expansion sockets.
- Before touching any electronic components or opening the package containing your new module(s), make sure you first touch an unpainted, grounded metal object to discharge any static electricity you may have stored on your body or clothing.
- Handle your new module(s) carefully; do not flex or bend the module(s). Always grasp the module by its edges.
- As shown in the illustration, the module and the expansion socket are keyed. A small plastic bridge in the socket must align with the curved notch in the module. The bridge ensures the module can only be plugged into the socket one way.
- Insert the module into the socket at a slight angle. Make sure the module is completely seated in the socket. If you're having problems inserting the module into the socket, stop and examine both the module and the socket; make sure the notch in the module is properly aligned with the keyed plastic bridge in the socket. Do not force the module into the socket. If too much force is used, both the socket and module could be damaged.
- Once you are satisfied the module is seated properly in the socket, rotate the module upward until the clips at each end of the expansion socket click into place.
- After all modules have been installed, close the computer, plug in the AC power cord, and reinstall any other cables that may have been disconnected during the installation process.
INSTALLING A 168-PIN DIMM
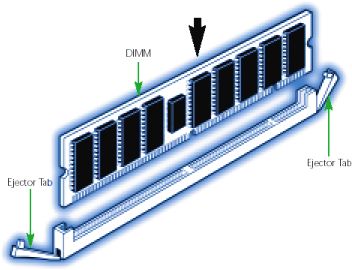
Installation of a 168-pin DIMM.
- Locate the memory expansion sockets on the computer's motherboard. If all the sockets are full, you will need to remove smaller capacity modules to allow room for higher capacity modules.
- For some installations, DIMM memory can be installed in any available expansion slot. Other installations may require the memory to be installed in a particular sequence based on the module's capacity. Check your owner's manual to determine the correct installation sequence for your configuration.
- Insert the module into an available expansion socket as shown in the illustration. Note how the module is keyed to the socket. This ensures the module can be plugged into the socket one way only. Firmly press the module into position, making certain the module is completely seated in the socket. Repeat this procedure for any additional modules you are installing.
- Most 168-pin DIMM modules have ejector tabs similar to those shown in the illustration. The ejector tabs are used only when you need to remove a module. By pressing down on the ejector tabs, the module will pop up from the socket and it can be removed.
INSTALLING A 184-PIN RIMM
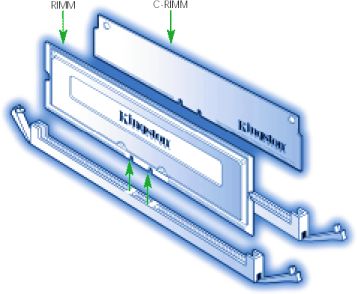
Installation of a 184-pin RIMM. RIMMs install into RIMM connectors. Currently, there are two connectors on the computer board, and each must contain a RIMM or a C-RIMM (continuity RIMM). C-RIMMs do not contain memory devices. They are inexpensive pass-through modules that provide a continuous channel for the signal.
- Turn off the computer and disconnect the AC power cord.
- Locate your computer's memory expansion sockets by following the instruc-tions in your owner's manual.
- Before touching any electronic components, make sure you first touch an unpainted, grounded metal object to discharge any static electricity stored on your clothing or body.
- If all the sockets are full, you will need to remove smaller capacity modules to allow room for higher capacity modules.
- The ejector tabs shown in the illustration are used to remove a module. By pushing outward on the ejector tabs, the module will pop up from the socket and it can then be removed.
- For most installations, Rambus modules can be installed in any available expansion socket, but any empty sockets must contain a continuity module as shown in the illustration. Note that some modes may use a specific installation sequence for Rambus modules (e.g. Rambus dual-channel configurations); see your owner's manual for more details.
- Insert the module into an available expansion socket as shown in the illustration. Note how the module is keyed to the socket. This ensures the module can be plugged into the socket one way only. Firmly press the module into position, making certain the module is completely seated in the socket. The ejector tabs at each end of the socket will automatically snap into the locked position. Repeat this procedure for any additional modules are installing.
- Once the module or modules have been installed, close the computer.
EXAMPLES OF NOTEBOOK MEMORY INSTALLATION
Although more and more notebooks accept standard SO DIMM memory modules, many still require proprietary modules having unique form factors. No standard dictates where the memory should be installed in the notebook. Because notebooks differ greatly in how memory is installed, you should consult your computer manual for specific instructions.This example shows a typical 144-pin SO DIM installation.
- Always turn off your computer and remove the rechargeable battery pack before installing the memory.
- Insert the module into the socket at a slight angle (approximately 30 degrees). Note that the socket and module are both keyed, which means the module can be installed one way only.
- To seat the module into the socket, apply firm, even pressure to each end of the module (see the arrows) until you feel it slip down into the socket. If you are having problems getting the module to seat properly, try rocking the module up and down slightly, while continuing to apply pressure. When properly seated, the contact fingers on the edge of the module will almost completely disappear inside the socket.
- With the module properly seated in the socket, rotate the module downward, as indicated in the illustration. Continue pressing downward until the clips at each end of the socket lock into position. With most sockets, you will hear a distinctive click, indicating the module is correctly locked into position.


